
Our first post of the new year is from Yakuza Like a Dragon, my 2020 game of the year. At this point, you all know I love this game. You can bet we’ll be seeing more Yakuza series recipes in the future. That’s just expected because most of my free time has been spent replaying through the whole series. I just can’t stop playing these games! For now, let’s talk about one of the big changes that Yakuza: Like a Dragon brought to the series, the job system.
There are a lot of jobs to explore as you make your way through the game. At times it can be overwhelming because there are a lot of skills in the game. Honestly, it might be too many. In the end, I did find myself having each of the characters pick up the cross class skills from most jobs and then returning to their unique class by the end of the game. Some of the options make sense like the foreman that will wield a large hammer and swing it to cause massive damage. Some other jobs are a bit on the weirder side like the host that will essentially entertain your enemies to death. The host class will whip out a whole birthday cake while yelling “Happy Birthday” before slamming it into the enemy’s face. The first time I saw this move, I knew I would be making this cake at some point. Why not to celebrate my birthday?

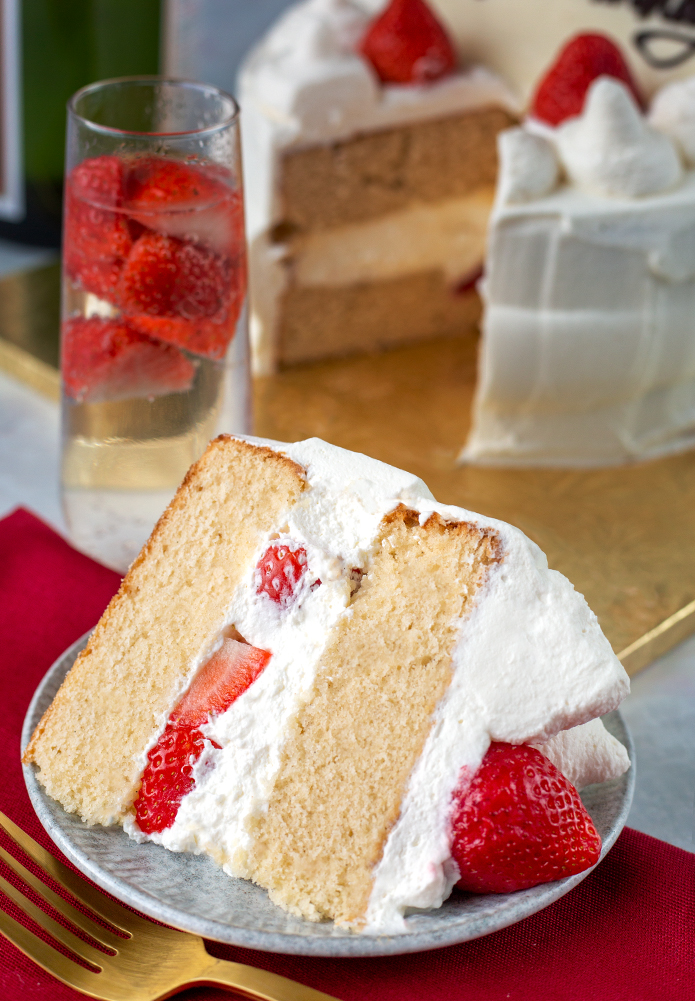
Happy Birthday to me and Ichiban! His birthday was on the first and mine is today, January 5th, wooo. This weekend I felt like treating myself to a whole cake. What better cake to use than the one the host class uses to bash an enemy with? This is a cake I worked on a few times to get just right. It took three attempts to end up with this result. Often a typically Japanese strawberry shortcake will use whipped eggs as the rising agent for the cake. This can be a trickier method and for some reason this past month it kept tripping me up. I ended up turning back to my good friend baking powder to get the perfect cake. This cake, the whipped cream, and strawberries makes for such a refreshingly sweet dessert. This cake isn’t as sweet as one with a buttercream frosting, but for me it is perfect. The perfect gift to myself!
Jump to Printable RecipeChocolate Birthday Plaque
⅓ cup white chocolate chips
3 tbsp dark chocolate chips
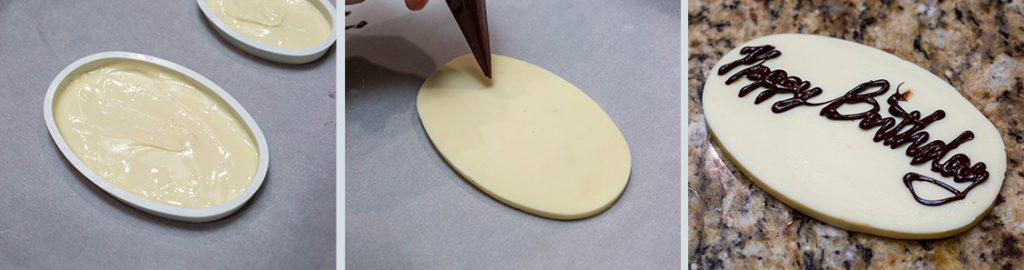
Take a 5-inch wide oval cookie cutter (or mold), place it on a baking sheet with parchment paper, and set aside. Place the white chocolate chips in a bowl and microwave until it melts, about 45 seconds in total. Make sure to mix it a few times during the heating process so none of it burns.
Pour the melted white chocolate in the cookie cutter (or mold). It should be about a quarter inch thick. Spread the melted chocolate and make it as smooth as you can, this will be the backside of the plaque. Place in the refrigerator until it hardens for about one hour. Carefully remove from the mold and flip to the side that is smoother. Place in the refrigerator until you are ready to write on it.
Prepare a piping bag with a #3 round tip. Place the dark chocolate chips in a bowl and microwave until it melts, about 20 seconds. Make sure to mix it a few times during the heating process so none of it burns. Transfer to the piping bag and write out happy birthday in cursive on the white chocolate oval you made earlier. I highly recommend practicing this a few times on parchment paper before attempting on the white chocolate oval.
Once written, place in the refrigerator and let cool until the dark chocolate has hardened. Place in an airtight container. It can be stored in the refrigerator for up to one month.
Cake
3 cups (405 g) cake flour
½ tsp (2 g) cinnamon
1 tbsp (14 g) baking powder
1 tsp (5 g) salt
1 cup (227 g) unsalted butter, room temperature
1 ½ cups (315 g) sugar
2 whole eggs
2 egg whites
1 tbsp (12 g) vanilla extract
2 tsp (9 g) cherry liqueur
1 vanilla bean, seeds scraped and pod discarded
1 cup (226 g) milk
¼ cup (57 g) buttermilk
Preheat an oven to 350°F. Prepare two 8-inch cake pans and spray the inside with non-stick spray. Carefully line each with parchment paper.
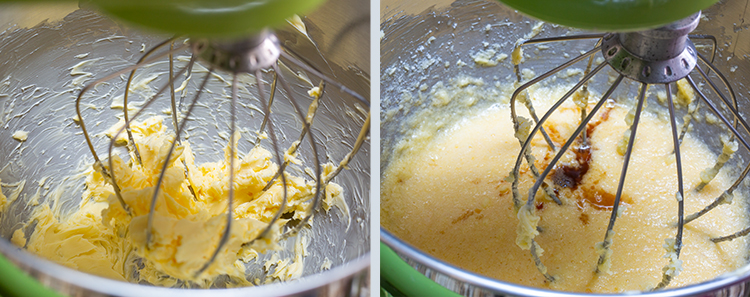
Combine the cake flour, cinnamon, baking powder, and salt in a bowl and set aside. In a large bowl, combine the butter and sugar and mix until smooth. Add the eggs, vanilla extract, cherry liqueur, and vanilla bean seeds.
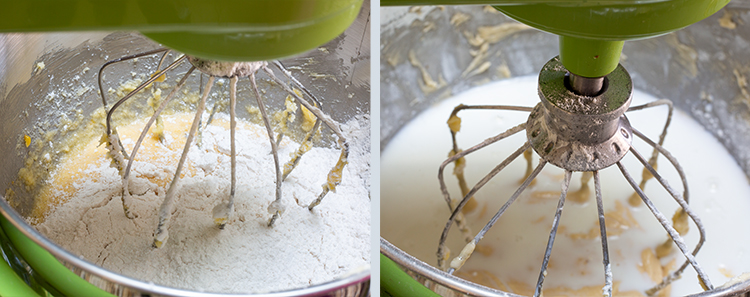
Place half of the dry ingredients into the large bowl and mix well. Add the milk and buttermilk. Mix until smooth. Add the remaining dry ingredients and mix until just combined
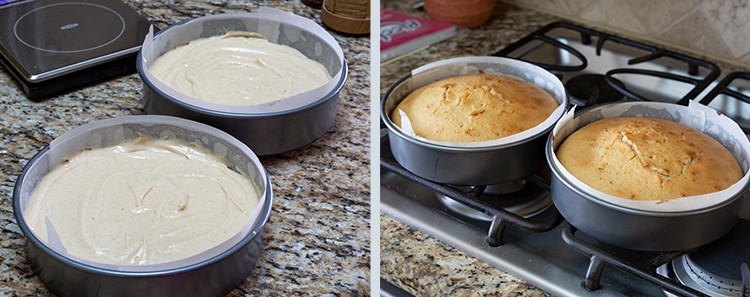
Split the batter evenly between the two prepared cakes pans. Lift each of the pans and bang lightly on the counter to remove any large air bubbles. Place in the oven and bake for 40-45 minutes or until a toothpick test comes out clean.
Allow to rest for 5 minutes and then remove from the pan onto a cooling rack. Make sure to remove the parchment paper from the cake and allow them to cool fully, at least an hour of resting time.
Whipped Cream Frosting
3 cups heavy cream
1 ½ tsp vanilla extract
4 ½ tbsp confectioners sugar
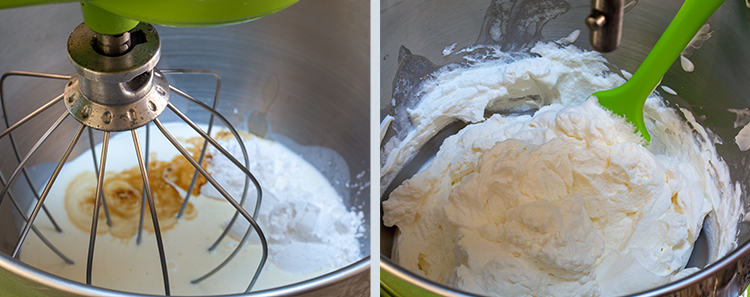
Combine everything in a bowl of a stand mixer. Whip on high speed until it reaches a state between soft and stiff peaks. I find that getting it a little past soft peaks makes it a bit sturdier on the cake. If you aren’t ready to assemble the cake, cover with plastic wrap and place the frosting bowl in the refrigerator.
Syrup
3 tbsp (45 g) sugar
2 tbsp (28 g) water
2 tbsp (33 g) cherry liqueur
Combine all the ingredients in a bowl. Place in the microwave for 15 seconds at a time and whisk between each heating until the sugar has dissolved. Set aside until you are ready to assemble.
Assembly
2 cake layers
whipped cream frosting
1 chocolate birthday plaque
10 – 14 strawberries, top removed and cut in half
6 strawberries, top removed
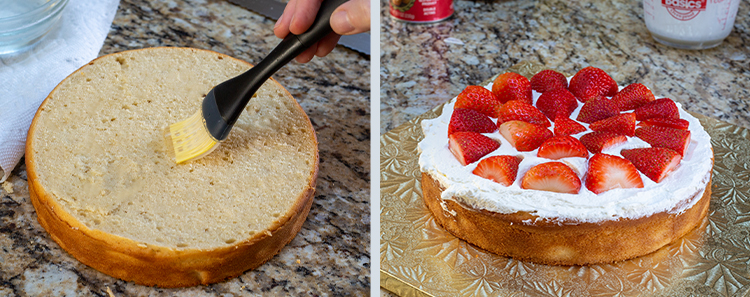
Once the cake layers have fully cooled, level both layers by cutting the top bump with a serrated knife. Place one of the layers on your serving plate.
Brush the cut side with the syrup, this helps keep the cake moist. Add about ¼ inch in thickness of frosting on top and spread evenly. Add halved strawberries and top more frosting, just enough to cover the strawberries.

Take the other cake layer and brush the cut side with syrup. Place the cake, cut side down on top of the frosting. If you still have syrup left, brush the top side with it.
Prepare a piping bag with a round tip (I used a Wilton 2A). Transfer about ⅓ cup of the whipped cream frosting and set aside. Completely cover the cake with the remaining whipped cream frosting. To get nice smooth sides, take an offset spatula edge against the side and rotate the cake around.
Take the prepared piping bag and make little whipped cream peaks near the edge of the cake. Place three of the whole strawberries on one half of the cake and the other three on the other side, to match the in-game item.
Take the chocolate birthday plaque and place it between the two sets of strawberries. It will rest on the back set. I recommend letting this cake sit covered in the refrigerator for at least 1 hour before cutting into it. It can be stored in the refrigerator for up to 3 days.

Birthday Bash Cake
Ingredients
Chocolate Birthday Plaque
- ⅓ cup white chocolate chips
- 3 tbsp dark chocolate chips
Cake
- 3 cups (405 g) cake flour
- ½ tsp (2 g) cinnamon
- 1 tbsp (14 g) baking powder
- 1 tsp (5 g) salt
- 1 cup (227 g) unsalted butter, room temperature
- 1 ½ cups (315 g) sugar
- 2 whole eggs
- 2 egg whites
- 1 tbsp (12 g) vanilla extract
- 2 tsp (9 g) cherry liqueur
- 1 vanilla bean seeds scraped and pod discarded
- 1 cup (226 g ) milk
- ¼ cup (57 g) buttermilk
Whipped Cream Frosting
- 3 cups heavy cream
- 1 ½ tsp vanilla extract
- 4 ½ tbsp confectioners sugar
Syrup
- 3 tbsp (45 g) sugar
- 2 tbsp (28 g) water
- 2 tbsp (33 g) cherry liqueur
Assembly
- 2 cake layers
- whipped cream frosting
- 1 chocolate birthday plaque
- 10 – 14 strawberries top removed and cut in half
- 6 strawberries top removed
Instructions
Chocolate Birthday Plaque
- Take a 5-inch wide oval cookie cutter (or mold), place it on a baking sheet with parchment paper, and set aside. Place the white chocolate chips in a bowl and microwave until it melts, about 45 seconds in total. Make sure to mix it a few times during the heating process so none of it burns.
- Pour the melted white chocolate in the cookie cutter (or mold). It should be about a quarter inch thick. Spread the melted chocolate and make it as smooth as you can, this will be the backside of the plaque. Place in the refrigerator until it hardens for about one hour. Carefully remove from the mold and flip to the side that is smoother. Place in the refrigerator until you are ready to write on it.
- Prepare a piping bag with a #3 round tip. Place the dark chocolate chips in a bowl and microwave until it melts, about 20 seconds. Make sure to mix it a few times during the heating process so none of it burns. Transfer to the piping bag and write out happy birthday in cursive on the white chocolate oval you made earlier. I highly recommend practicing this a few times on parchment paper before attempting on the white chocolate oval.
- Once written, place in the refrigerator and let cool until the dark chocolate has hardened. Place in an airtight container. It can be stored in the refrigerator for up to one month.
Cake
- Preheat an oven to 350°F. Prepare two 8-inch cake pans and spray the inside with non-stick spray. Carefully line each with parchment paper.
- Combine the cake flour, cinnamon, baking powder, and salt in a bowl and set aside. In a large bowl, combine the butter and sugar and mix until smooth. Add the eggs, vanilla extract, cherry liqueur, and vanilla bean seeds.
- Add half of the dry ingredients into the large bowl and mix well. Add the milk and buttermilk. Mix until smooth. Add the remaining dry ingredients and mix until just combined
- Split the batter evenly between the two prepared cakes pans. Lift each of the pans and bang lightly on the counter to remove any large air bubbles. Place in the oven and bake for 40-45 minutes or until a toothpick test comes out clean.
- Allow to rest for 5 minutes and then remove from the pan onto a cooling rack. Make sure to remove the parchment paper from the cake and allow them to cool fully, at least an hour of resting time.
Whipped Cream Frosting
- Combine everything in a bowl of a stand mixer. Whip on high speed until it reaches a state between soft and stiff peaks. I find that getting it a little past soft peaks makes it a bit sturdier on the cake. If you aren’t ready to assemble the cake, cover with plastic wrap and place the frosting bowl in the refrigerator.
Syrup
- Combine all the ingredients in a bowl. Place in the microwave for 15 seconds at a time and whisk between each heating until the sugar has dissolved. Set aside until you are ready to assemble.
Assembly
- Once the cake layers have fully cooled, level both layers by cutting the top bump with a serrated knife. Place one of the layers on your serving plate.
- Brush the cut side with the syrup, this helps keep the cake moist. Add about ¼ inch in thickness of frosting on top and spread evenly. Add halved strawberries and top more frosting, just enough to cover the strawberries.
- Take the other cake layer and brush the cut side with syrup. Place the cake, cut side down on top of the frosting. If you still have syrup left, brush the top side with it.
- Prepare a piping bag with a round tip (I used a Wilton 2A). Transfer about ⅓ cup of the whipped cream frosting and set aside. Completely cover the cake with the remaining whipped cream frosting. To get nice smooth sides, take an offset spatula edge against the side and rotate the cake around.
- Take the prepared piping bag and make little whipped cream peaks near the edge of the cake. Take the whole strawberries and place three on one half of the cake and the other three on the other side, to match the in-game item.
- Take the chocolate birthday plaque and place it between the two sets of strawberries. It will rest on the back set. I recommend letting this cake sit covered in the refrigerator for at least 1 hour before cutting into it. It can be stored in the refrigerator for up to 3 days.