
Brute force, arrows, and magical spells are not the only thing an adventurer requires in order to defend their people from dragons and undead. A young Sylvari ranger realized this issue and began to explore what she could do in order to make her travels easier. Quickly running to the Grove, she found a simple cauldron and began tinkering with the tools around the area. Soon she began to develop recipes that seemed to improve her abilities. From tarts that would increase her ability to find better items, spaghetti and meatballs that would increase toughness, and so on. She knew what she had to do from this point on: create as many food supplies as she could. These supplies would not only be great for her but for all of her guildmates as well. United as one, the guild and food would make them an unstoppable force!
I’m sure by now you can see when a game allows the option of cooking I tend to embrace it just like I do in real life. I love the chef profession in Guild Wars 2! This profession makes me smile each time I put ingredients together and it gives end result that make sense in real life. With that said, there are several recipes from this game I will be bringing to life eventually. Today we will focus on a delicious dessert, blackberry pie. After my most recent trip to Seattle and several delicious desserts consisting of blackberries, I realized I needed to make this on my own. I got an itch to make it again when I noticed a blackberry pie recipe in Guild Wars 2.
This is a pretty simple recipe. However, this can be a pretty tart tasting dessert seeing as how blackberries tend to be pretty bitter at times. If you are looking for a really sugary dessert this isn’t the one for you, but if you want something tart and bold in flavor you are in for a treat! I will be providing a recipe for the pie crust also, but feel free to use a premade pie if you do not have time.
Ingredients:
Crust:
2 cups all purpose flour
Pinch of salt and sugar
12 tbsp butter
½ cup cold water (might not need all of it)
Filling:
24-30 ounces of blackberries
1/3 cup sugar
2 tsp cinnamon
1 tsp nutmeg
juice of 1 lemon
blackberry jam

Let’s start with the crust! Place your butter in the freezer for about 30 minutes (this will make it much easier to work with). In a bowl combine the flour, salt and sugar. Take the box grater and grate the frozen butter.

Once the butter is grated, combine with the flour mixture. Slowly begin to add water to the mixture. You do not want to put too much. You’ll want to put enough liquid in the mixture to have it all combine together. Keep in mind you will probably not use the entire ½ cup of water.

After you have combined everything in a bowl begin kneading the dough on your countertop. In the pictures you will notice I’m stretching the dough with the palms of my hand. This helps make the dough nice and flaky.

Once you’ve worked the dough enough, form it into a ball and wrap it in plastic wrap. Allow the dough to sit in the refrigerator for at least an hour. After an hour, pre-heat your oven at 375°F. Flatten the dough by using a rolling pin while keeping the plastic wrap over the dough. This will make it much easier to work with and keep it from sticking to the rolling pin.

After getting the dough stretched out, place it inside your tart (or pie) tray. To remove the excess dough, simply roll the rolling pin over the tray. The edge of a tart tray is typically sharp enough to cut the dough. In the pan, give the dough a few pokes with a fork.

Place parchment over the dough and place a tray on it. This will place weight on the crust so it doesn’t lift up. Put your crust inside the oven for 15-20 minutes to give it a little bit of a bake. After it has baked, place on a cooling rack.

While the crust is in the oven take this time to make the filling. Mix the blackberries, sugar, cinnamon, nutmeg and lemon juice in a bowl.

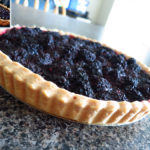
At the bottom of the crust, spread blackberry jam. Do not put too much! Otherwise, the pie will be overly sweet. Place the mixed blackberries over the jam and make sure to spread it out evenly. Bake, at 375°F, for about an hour or until the crust becomes golden brown. I like to place the tart pan on top of a baking sheet just in case the juices from the blackberries bubble over. Once baked, allow the dessert to cool. I would recommend letting the pie sit in the refrigerator for a few hours before serving.

Blackberry Tart
Ingredients
Crust
- 2 cups all-purpose flour
- pinch of salt
- pinch of sugar
- 12 tbsp butter, cold
- 1/2 cup cold water (might not need all of it)
Filling
- 24-30 ounces of blackberries
- 1/3 cup sugar
- 2 tsp cinnamon
- 1 tsp nutmeg
- juice of 1 lemon
- blackberry jam
Instructions
- Let’s start with the crust! Place your butter in the freezer for about 30 minutes (this will make it much easier to work with). In a bowl combine the flour, salt and sugar. Take the box grater and grate the frozen butter.
- Once the butter is grated, combine with the flour mixture. Slowly begin to add water to the mixture. You do not want to put too much. You’ll want to put enough liquid in the mixture to have it all combine together. Keep in mind you will probably not use the entire ½ cup of water.
- After you have combined everything in a bowl begin kneading the dough on your countertop. In the pictures you will notice I’m stretching the dough with the palms of my hand. This helps make the dough nice and flaky.
- Once you’ve worked the dough enough, form it into a ball and wrap it in plastic wrap. Allow the dough to sit in the refrigerator for at least an hour. After an hour, pre-heat your oven at 375°F. Flatten the dough by using a rolling pin while keeping the plastic wrap over the dough. This will make it much easier to work with and keep it from sticking to the rolling pin.
- After getting the dough stretched out, place it inside your tart (or pie) tray. To remove the excess dough, simply roll the rolling pin over the tray. The edge of a tart tray is typically sharp enough to cut the dough. In the pan, give the dough a few pokes with a fork.
- Place parchment over the dough and place a tray on it. This will place weight on the crust so it doesn’t lift up. Put your crust inside the oven for 15-20 minutes to give it a little bit of a bake. After it has baked, place on a cooling rack.
- While the crust is in the oven take this time to make the filling. Mix the blackberries, sugar, cinnamon, nutmeg and lemon juice in a bowl.
- At the bottom of the crust, spread blackberry jam. Do not put too much! Otherwise, the pie will be overly sweet. Place the mixed blackberries over the jam and make sure to spread it out evenly. Bake, at 375°F, for about an hour or until the crust becomes golden brown. I like to place the tart pan on top of a baking sheet just in case the juices from the blackberries bubble over. Once baked, allow the dessert to cool. I would recommend letting the pie sit in the refrigerator for a few hours before serving.
[…] the pie crust. For photo reference of these steps please check out my blackberry pie recipe found here. The major difference here is when combining your dry ingredients into a bowl mix in the cinnamon, […]