
Clair Obscur: Expedition 33 is one of the most incredible games I’ve ever played in a very long time. Since finishing the game, I’ve just had it on my mind and can’t stop thinking about the incredible story. The characters, the music, and the gameplay were crafted with such love and care that it truly shines throughout the whole game. Jeff and I played the game together; we would each take turns playing and it was really enjoyable. It works perfectly for us because I did most of the story portions and Jeff would go around parrying all the enemies that were optional and much more difficult. The end of the game did become a bit easy because we made sure to clear out the extra content before wrapping things up. We enjoyed the game so much that we just kinda ended up getting all the achievements, which is very rare for us to do in a game.

When Expedition 33 initially released, Jeff and I were busy with several major events, including a big move and playing too much Blue Prince. We both knew it was a game we were looking forward to but couldn’t find time to play until August. As we started playing we noticed very quickly that one of the core themes of Expedition 33 is how one processes grief. The game hit a lot harder than I expected because we started our playthrough right as we were going through our own journey of grief. Unfortunately, at the end of July, we had to make the sudden and difficult decision to say goodbye to Kanji, our corgi of 13 years. Kanji really did enjoy chilling on the couch and watching us play through games. I missed having his little fuzzy butt next to us and I know that he would have loved Expedition 33 as much as we did. Expedition 33 and Kanji’s passing will go hand in hand and I am grateful for the game being there during our time of grief. Many tears were shed the whole time and I really appreciate how much comfort this game brought us as we were playing.
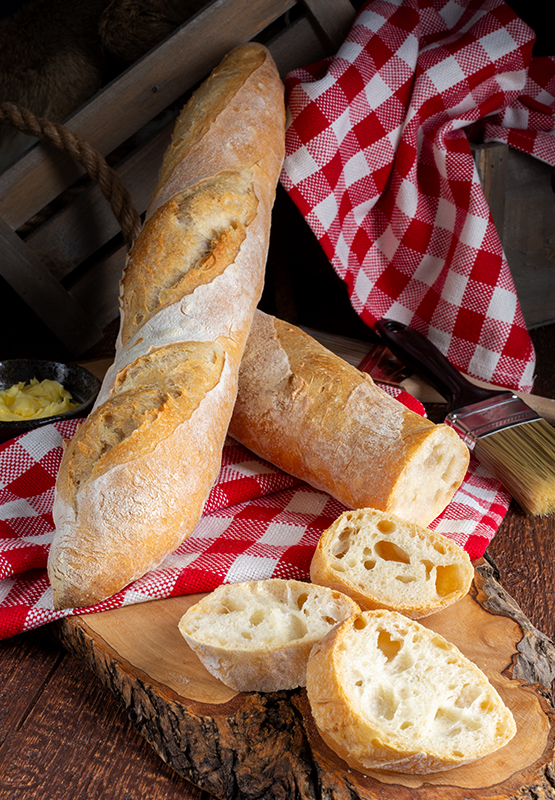
Since the game really means so much to Jeff and I, I have to show my appreciation for the game by making a recipe. There are a few food items thrown around in the world but I knew the moment Jeff defeated one of the mimes and was rewarded with the baguette outfit, I’d be making baguettes. I’ve previously done baguette inspired recipes that don’t require a lot of extra equipment. I’d say they all got close but never really had the crunch that I’ve come to expect and love from a baguette. Baguettes are not easy and will require a lot of practice. I still think I’m learning the art of these and will continue to get better with each bake. I am very happy with the way they taste and the overall structure so I felt it was time to share my results.

A few notes before we dive into this recipe: this recipe does use a lot of unique equipment and requires a decent amount of time to put together. I have listed all the equipment I used for this recipe below. If there is one item you need to pick up I believe the kitchen scale is the most important. Bread recipes work more consistently by weighing the ingredients so everything in this recipe is weighed by grams and will require you to have a kitchen scale to make this.
The dough will be incredibly sticky and can be really difficult to deal with the first time you try making this. I promise as long as you keep a wet hand during the first stage and then a lightly floured hand during the shaping process it’ll be so much easier! The shaping of the dough is the most difficult part of this whole process and you will only get better the more you practice making this recipe. I know as I keep making these my form will continue to improve and my baguettes will look better with each attempt. So, if your baguette isn’t perfect, at least know that it will taste amazing and the next time you try you’ll get a little more comfortable with the process. The biggest tip for these is to be patient and practice! Enough talk let’s get to baking.
Required Equipment: Kitchen Scale, 1 Tall Jar, Large Bowl, Medium Bowl, Kitchen Scraper, Baker’s Couche, Baking Stone, Rimless Baking Sheet, Baguette Transfer Peel, Lame, Oven Safe Pan
Poolish
100 grams all-purpose flour
100 grams water, room temp
pinch of active dry yeast

Whisk together the ingredients for the poolish in a tall jar.
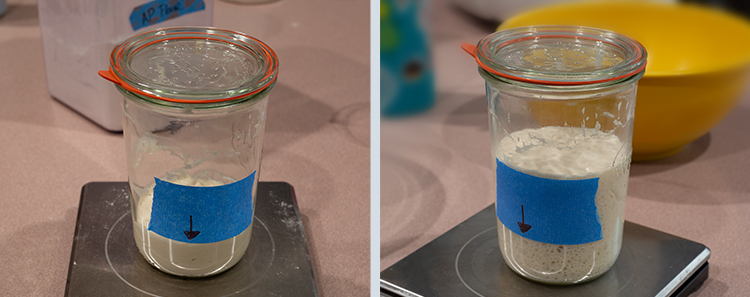
Loosely cover and allow to rest at room temperature for 6 to 12 hours, or until it has doubled in size.
Baguette
340 grams all-purpose flour
10 grams kosher salt
220 grams warm water
poolish
4 grams active dry yeast
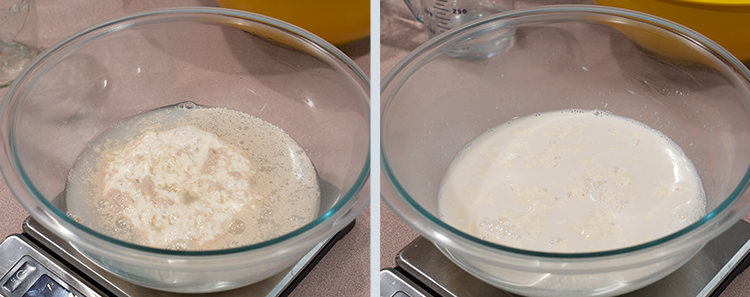
Step 1. Combine the flour and salt in a medium bowl. Combine the warm water, poolish, and yeast in a large bowl and mix until the poolish dissolves.
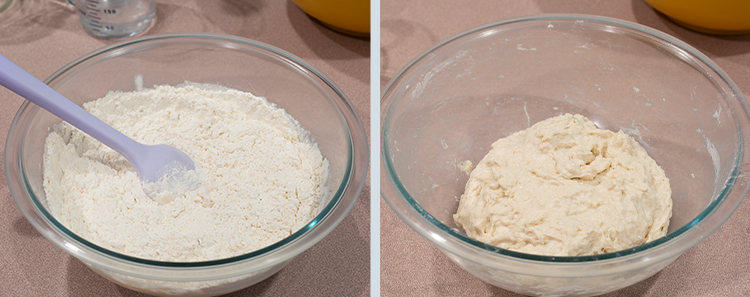
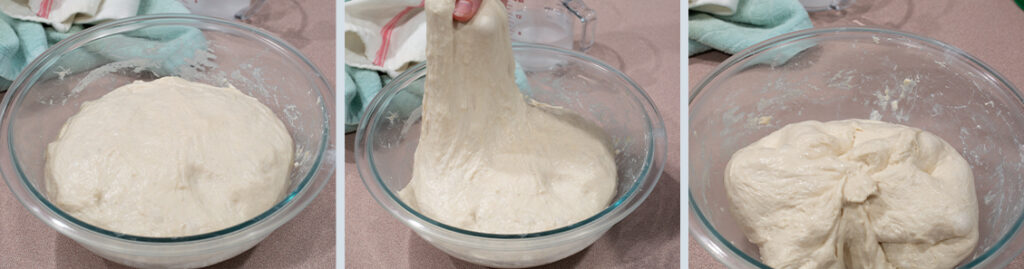
Step 2. Add the flour mixture to the bowl and mix until it just comes together. The dough will be sticky and pretty loose at this point. Cover with a kitchen cloth and let rest for 30 minutes at room temperature.
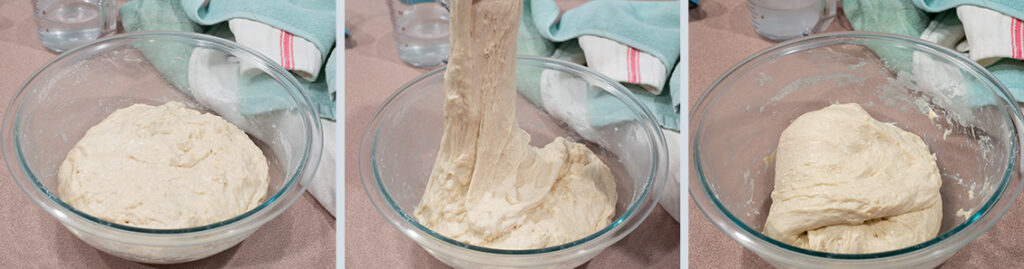
Step 3. Wet your hands, uncover the dough, and lightly pull on the dough upward as far as it will let you. Fold it to the center and gently pat down. Repeat this around the entire dough. Flip over (smooth side facing up), cover, and rest for another 30 minutes at room temperature.
Step 4. Repeat step 3 twice more.
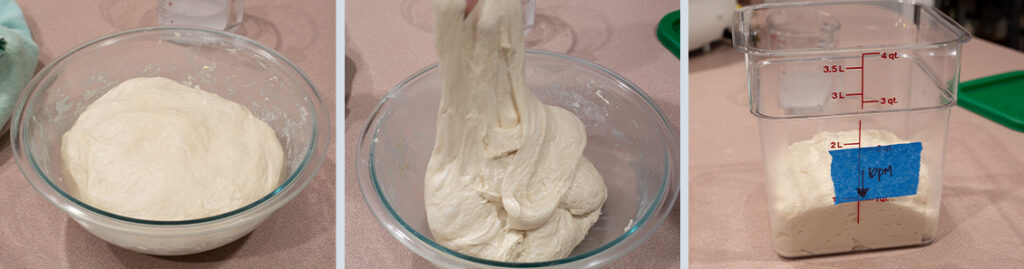
Step 5. After you have repeated this process 3 times, cover, and place in the refrigerator overnight, up to 24 hours.
Note: I like to transfer mine into a square container (pictured above) that has capacity lines on it. This makes it a bit easier to track how much the dough has risen.
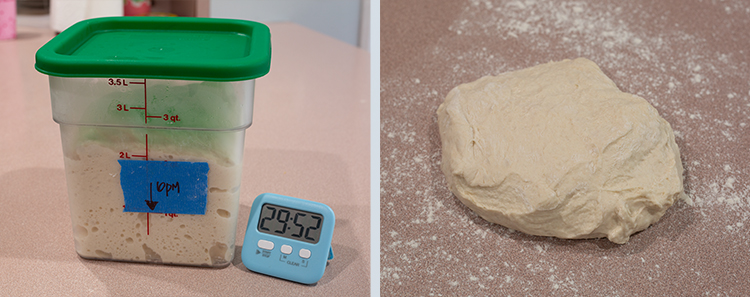
Step 6. The next day, remove the dough from the refrigerator and let it rest for 30 minutes, making sure the dough has doubled in size from yesterday.
Note: The dough will likely have risen double in size during its rest time in the refrigerator. Still give the dough 30 minutes to warm up before working with it.
Step 7. Transfer the dough to a lightly floured work surface. Split into two equal portions (about 380 grams each). During this whole process make sure to keep your hands lightly floured because the dough will be very sticky.
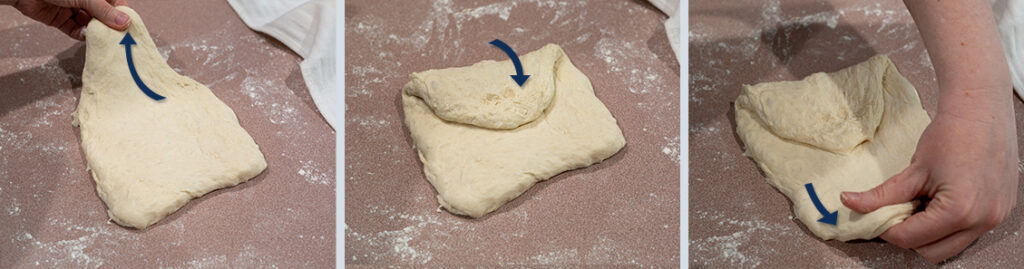
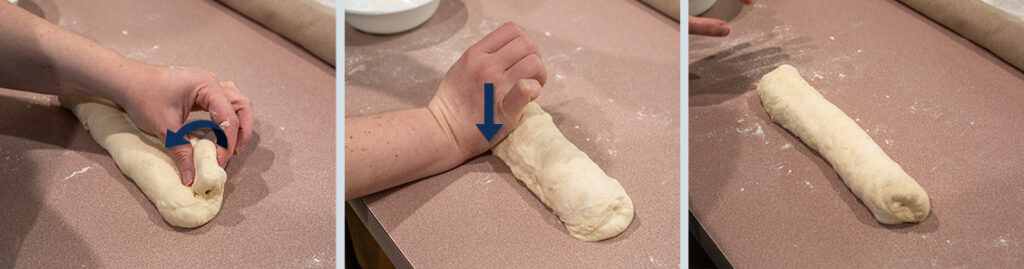
Step 8. Take one of the portions and shape by tapping it into a rough 6-inch (15 cm) square. Make sure to pop any larger bubbles in the dough. Lightly stretch one of the sides and fold it to the center. Stretch the opposite side over and fold it over the center. The dough should now be a long rectangle shape.
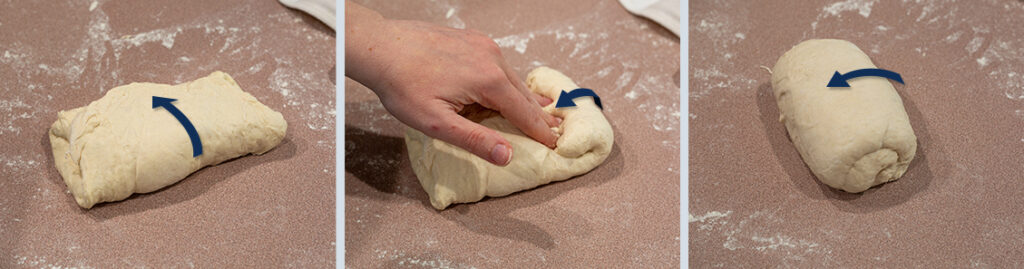
Step 9. From the top, roll the dough toward you and over itself into a tight cylinder. Transfer to a lightly floured surface, seam-side down, and cover with a kitchen towel.
Step 10. Repeat steps 8 and 9 with the other portion.
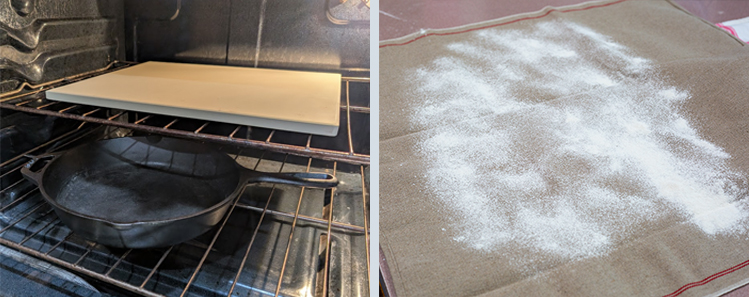
Step 11. Let the dough rest for 15 to 20 minutes. While you wait, prepare the oven by placing the baking stone on the center rack of the oven. On a lower rack place a large oven safe pan. Preheat the oven to 500°F (260°C). Prepare the baker’s couch by generously dusting with flour, set aside.
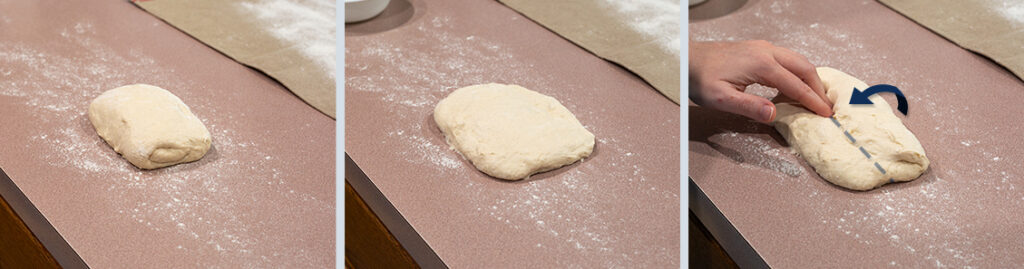
Step 12. Once the dough has rested and looks a bit relaxed, lightly flour a work surface. Using a kitchen scraper, take one of the dough portions and transfer it to the lightly floured surface, seam side up.
Step 13. Lightly flour your hands, the dough is still very sticky and will easily stick to you. Lightly tap and shape into a rectangle, making sure to, once again, pop any large bubbles. The long edges of the rectangle should be the top and bottom parts.
Step 14. Take the top part of the dough and fold it into the center and press the dough to seal it.
Step 15. Rotate the dough 180° so the bottom edge is now the top. Take the new top and fold it to the center, creating a single seam with the previous fold in the center of the dough.
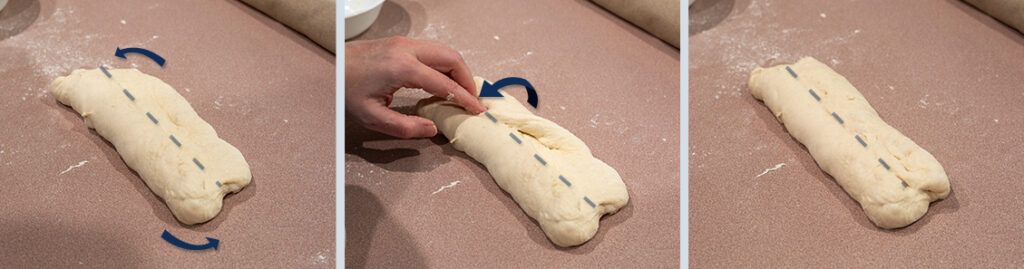
Step 16. Take the top edge of the dough and fold it, over the seam, to the bottom edge, use the base of your palm to seal it shut.
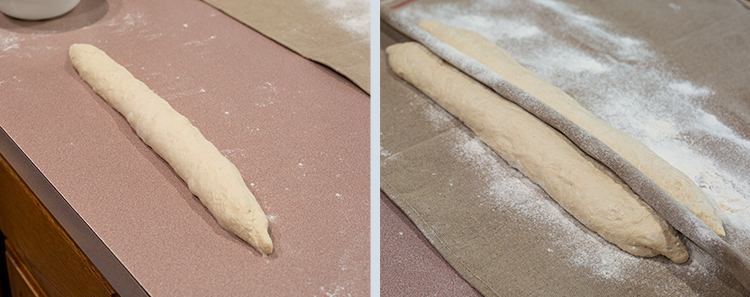
Step 17. At this point you should have a rough tube shaped dough. Place the seam side down on the work area. Using both your hands, lightly roll the dough out to 16 inch (40.5 cm) long, putting slightly more pressure at the ends to taper it off.
Step 18. Transfer to the prepared baker’s couche and place it seam-side up. Form a wall with the baker’s couche to help keep the dough’s shape as it rests.
Step 19. Repeat steps 12 through 18 with the other portion. Make sure to cover with the baker’s couche while the dough proofs.
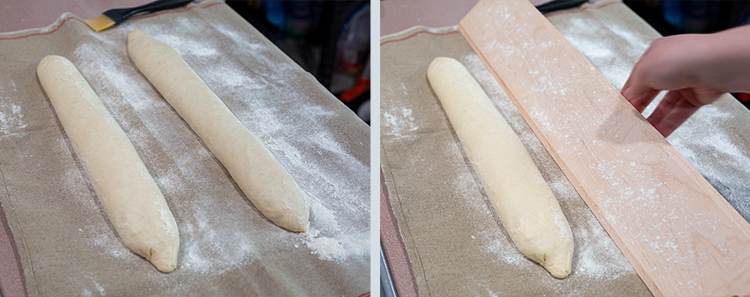
Step 20. Proof the dough for 60 minutes, or until they’ve risen about 60%. Make sure during the proofing process, the dough is being supported by the baker’s couche so it doesn’t lose its shape.
Step 21. To test if the dough has proofed enough, flour a finger and poke the dough. If it pops back up immediately, it needs longer. Check back in 10 minutes. If it returns back slowly and a dimple remains, the dough is set.
Step 22. About 10 minutes before you are going to transfer these to the oven, bring 1 ½ cups of water to a boil. Also, prepare a rimless baking sheet with a large piece of parchment paper and sprinkle a bit of flour on top. Prepare the baguette transfer peel by coating generously with flour.
Step 23. Unwrap the baker’s couche, place the baguette transfer peel next to one of the loaves. Carefully, flip the loaf on to the peel so it is seam side down on the transfer peel.
Note: If the loaf is stuck on the couche, lightly jiggle it to help it from unsticking from the couche.
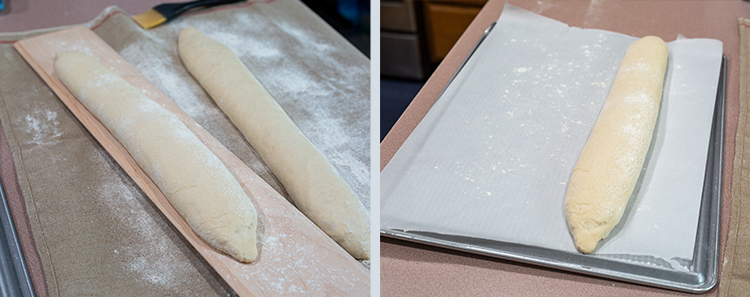
Step 24. Carefully slide the loaf from the transfer peel onto the prepared parchment paper. Make sure the seam side is down.
Step 25. Repeat steps 23 through 24 with the other loaf.
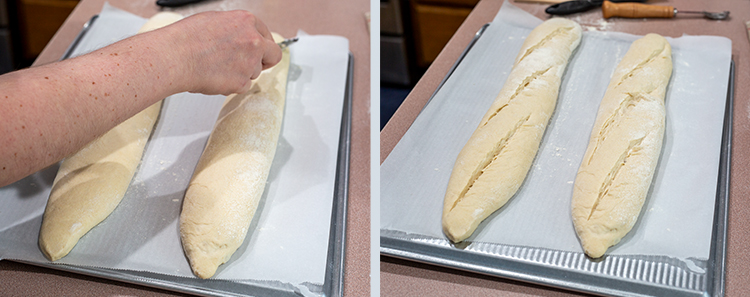
Step 26. Lightly coat a lame with flour. Using a lame to score the baguettes 3 to 5 times.
Note: Move quickly and confidentially with the lame when cutting. If you hesitate it will stick and not cut cleanly.
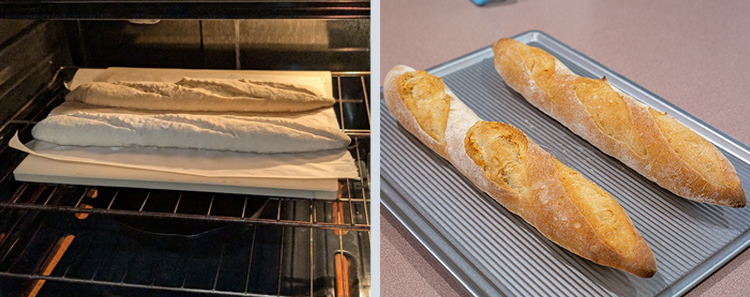
Step 27. Open the oven and carefully slide the parchment paper and loaves on top of the baking stone. Carefully, pull the rack with the pan below the baking stone, pour the boiling water into the pan, slide the rack back under, and shut the door. Bake for 10 minutes.
Note: When pouring the water in the pan a lot of steam will come up. I highly recommend covering both hands with insulated kitchen gloves and to not put your head directly over the pan to avoid any burns.
Step 28. Reduce the heat to 450°F (232°C). Open the oven door for a couple of seconds to release any remaining steam in the oven. Bake for 10 to 15 minutes, or until the crust is golden brown. Remove the loaves by using a tong to remove them from the oven and transfer to a cooling rack. Allow the loaves to cool completely before cutting them.

Baguette
Equipment
- Kitchen Scale, 1 Tall Jar, Large Bowl, Medium Bowl, Kitchen Scraper, Baker’s Couche, Baking Stone, Rimless Baking Sheet, Baguette Transfer Peel, Lame, Oven Safe Pan
Ingredients
Poolish
- 100 grams all-purpose flour
- 100 grams water room temp
- pinch of active dry yeast
Baguette
- 340 grams all-purpose flour
- 10 grams kosher salt
- 220 grams warm water
- poolish
- 4 grams active dry yeast
Instructions
Poolish
- Whisk together the ingredients for the poolish in a tall jar.
- Loosely cover and allow to rest at room temperature for 6 to 12 hours, or until it has doubled in size.
Baguette
- Combine the flour and salt in a medium bowl. Combine the warm water, poolish, and yeast in a large bowl and mix until the poolish dissolves.
- Add the flour mixture to the bowl and mix until it just comes together. The dough will be sticky and pretty loose at this point. Cover with a kitchen cloth and let rest for 30 minutes at room temperature.
- Wet your hands, uncover the dough, and lightly pull on the dough upward as far as it will let you. Fold it to the center and gently pat down. Repeat this around the entire dough. Flip over (smooth side facing up), cover, and rest for another 30 minutes at room temperature.
- Repeat step 3 twice more.
- After you have repeated this process 3 times, cover, and place in the refrigerator overnight, up to 24 hours.Note: I like to transfer mine into a square container (pictured above) that has capacity lines on it. This makes it a bit easier to track how much the dough has risen.
- The next day, remove the dough from the refrigerator and let it rest for 30 minutes, making sure the dough has doubled in size from yesterday.Note: The dough will likely have risen double in size during its rest time in the refrigerator. Still give the dough 30 minutes to warm up before working with it.
- Transfer the dough to a lightly floured work surface. Split into two equal portions (about 380 grams each). During this whole process make sure to keep your hands lightly floured because the dough will be very sticky.
- Take one of the portions and shape by tapping it into a rough 6-inch (15 cm) square. Make sure to pop any larger bubbles in the dough. Lightly stretch one of the sides and fold it to the center. Stretch the opposite side over and fold it over the center. The dough should now be a long rectangle shape.
- From the top, roll the dough toward you and over itself into a tight cylinder. Transfer to a lightly floured surface, seam-side down, and cover with a kitchen towel.
- Repeat steps 8 and 9 with the other portion.
- Let the dough rest for 15 to 20 minutes. While you wait, prepare the oven by placing the baking stone on the center rack of the oven. On a lower rack place a large oven safe pan. Preheat the oven to 500°F (260°C). Prepare the baker’s couch by generously dusting with flour, set aside.
- Once the dough has rested and looks a bit relaxed, lightly flour a work surface. Using a kitchen scraper, take one of the dough portions and transfer it to the lightly floured surface, seam side up.
- Lightly flour your hands, the dough is still very sticky and will easily stick to you. Lightly tap and shape into a rectangle, making sure to, once again, pop any large bubbles. The long edges of the rectangle should be the top and bottom parts.
- Take the top part of the dough and fold it into the center and press the dough to seal it.
- Rotate the dough 180° so the bottom edge is now the top. Take the new top and fold it to the center, creating a single seam with the previous fold in the center of the dough.
- Take the top edge of the dough and fold it, over the seam, to the bottom edge, use the base of your palm to seal it shut.
- At this point you should have a rough tube shaped dough. Place the seam side down on the work area. Using both your hands, lightly roll the dough out to 16 inch (40.5 cm) long, putting slightly more pressure at the ends to taper it off.
- Transfer to the prepared baker’s couche and place it seam-side up. Form a wall with the baker’s couche to help keep the dough’s shape as it rests.
- Repeat steps 12 through 18 with the other portion. Make sure to cover with the baker’s couche while the dough proofs.
- Proof the dough for 60 minutes, or until they’ve risen about 60%. Make sure during the proofing process, the dough is being supported by the baker’s couche so it doesn’t lose its shape.
- To test if the dough has proofed enough, flour a finger and poke the dough. If it pops back up immediately, it needs longer. Check back in 10 minutes. If it returns back slowly and a dimple remains, the dough is set.
- About 10 minutes before you are going to transfer these to the oven, bring 1 ½ cups of water to a boil. Also, prepare a rimless baking sheet with a large piece of parchment paper and sprinkle a bit of flour on top. Prepare the baguette transfer peel by coating generously with flour.
- Unwrap the baker’s couche, place the baguette transfer peel next to one of the loaves. Carefully, flip the loaf on to the peel so it is seam side down on the transfer peel.Note: If the loaf is stuck on the couche, lightly jiggle it to help it from unsticking from the couche.
- Carefully slide the loaf from the transfer peel onto the prepared parchment paper. Make sure the seam side is down.
- Repeat steps 23 through 24 with the other loaf.
- Lightly coat a lame with flour. Using a lame to score the baguettes 3 to 5 times.Note: Move quickly and confidentially with the lame when cutting. If you hesitate it will stick and not cut cleanly.
- Open the oven and carefully slide the parchment paper and loaves on top of the baking stone. Carefully, pull the rack with the pan below the baking stone, pour the boiling water into the pan, slide the rack back under, and shut the door. Bake for 10 minutes.Note: When pouring the water in the pan a lot of steam will come up. I highly recommend covering both hands with insulated kitchen gloves and to not put your head directly over the pan to avoid any burns.
- Reduce the heat to 450°F (232°C). Open the oven door for a couple of seconds to release any remaining steam in the oven. Bake for 10 to 15 minutes, or until the crust is golden brown. Remove the loaves by using a tong to remove them from the oven and transfer to a cooling rack. Allow the loaves to cool completely before cutting them.